Introduction: Welcome!
Welcome to this collection of guides focused on setting up and navigating a macOS development environment, along with various essential tools and technologies. Whether you're configuring a new machine, learning about tools like Homebrew, Git, Docker, or Conda, or just looking for handy cheatsheets, I hope you find the information here useful.

About the Author
This book was compiled by Ravishankar Sivasubramaniam (Ravi).
Ravi is a technologist with two decades of experience architecting and building scalable data, AI, and enterprise systems. As a Technology Leader, AI & Data Strategist, and Automation Expert, he is passionate about optimizing workflows, building strong teams, and solving complex challenges. These guides reflect many of the tools and practices used in modern development environments.
Connect
You can connect with Ravi through the following channels:
- Email: [email protected]
- GitHub: github.com/ravishan16
- LinkedIn: linkedin.com/in/ravishan16
- Twitter: @ravishankar_s
Let's dive into the guides!
User Guide: Setting Up Your Mac Development Environment 🚀
This guide will help you use the dotFile scripts to set up your Mac for development. Follow these steps to install tools, configure settings, and get ready to code!
Prerequisites: Things to Do First ✅
Before starting, make sure you've completed these steps:
- Set Up Your Mac: Complete the macOS startup wizard (language, Wi-Fi, Apple ID, user account).
- Connect to the Internet: Ensure your Mac is online.
- Open Terminal: Go to
Applications > Utilitiesand openTerminal.app. - Install Xcode Command Line Tools:
- These tools are required for Homebrew and other installations.
- Run this command in Terminal:
xcode-select --install - A pop-up window will appear. Click "Install" and agree to the terms.
- Wait for the installation to finish completely before moving on.
Step 1: Choose a Folder for Your Code (GIT_HOME) 📂
Decide where you want to store all your coding projects. Common choices are ~/projects/git or ~/Code. For this guide, we'll use ~/projects/git.
Step 2: Download the dotFile Repository 📥
-
Fork the Repository:
- Why Fork? Forking creates your own personal copy of this repository under your GitHub account. This allows you to save your customizations (like your specific dotFile, package lists,
.envfile content) without affecting the original project. - How: Go to the main page of the original repository on GitHub. Click the "Fork" button near the top-right. Choose your GitHub account as the owner for the fork.
- Why Fork? Forking creates your own personal copy of this repository under your GitHub account. This allows you to save your customizations (like your specific dotFile, package lists,
-
Clone Your Fork: Now, download the code from your forked repository to your local Mac.
- Choose Location: Decide where you want to store your code projects (e.g.,
~/Projects,~/Code,~/projects/git). This will be yourGIT_HOME. - Clone Command: Open Terminal and run
git clone, replacing<your-fork-url>with the SSH or HTTPS URL of your forked repository (get it from the "Code" button on your fork's GitHub page). It's recommended to name the local directorydotFile.
# Example: If your chosen code directory is ~/projects/git # Ensure the parent directory exists first mkdir -p ~/projects/git # Navigate into it cd ~/projects/git # Clone YOUR FORK, naming the local folder 'dotFile' # Replace <your-fork-url> with the actual URL from YOUR fork! git clone <your-fork-url> dotFile- You now have the setup files locally, typically at
~/projects/git/dotFile/.
- Choose Location: Decide where you want to store your code projects (e.g.,
-
Your Terminal prompt should now show you're inside
~/Projects/dotFile.
Step 3: Create Your Secret .env File 🤫
This file stores your personal information (like your Git name and email). Follow these steps:
- Make sure you're inside the
dotFilefolder:# Example: If your chosen code directory is ~/projects/git cd ~/Projects/dotFile - Create the
.envfile:touch .env - Open the file for editing:
nano .env - Add the following lines, replacing the placeholders with your actual details:
# --- REQUIRED --- # Path to your code folder GIT_HOME="/Users/your_mac_username/projects/git" # Your name for Git commits GIT_AUTHOR_NAME="Your Name" # Your email for Git commits GIT_AUTHOR_EMAIL="[email protected]"- Replace
your_mac_usernamewith your macOS username. - Double-check the
GIT_HOMEpath is correct.
- Replace
- Save and exit
nano:- Press
Ctrl+X, typeY, and pressEnter.
- Press
Step 4: Prevent .env from Being Shared 🚫
To ensure your .env file isn't accidentally shared:
- Run this command:
echo ".env" >> .gitignore - (Optional) Save this change to your repository:
git add .gitignore
git commit -m "Ignore .env file"
Step 5: Customize Your Settings 🛠️
The dot/ folder contains configuration files that will be applied to your system. Review and edit them as needed:
- Check
dot/.zshrc:- Ensure the
plugins=(...)line includes useful plugins like:plugins=(git zsh-autosuggestions zsh-syntax-highlighting autojump) - Set the theme to:
ZSH_THEME="powerlevel10k/powerlevel10k"
- Ensure the
- Edit
dot/.aliases:- Add shortcuts for commands you use often.
- Edit
dot/.gitignore_global:- Add patterns to ignore files globally, like:
*.log
.DS_Store
- Add patterns to ignore files globally, like:
Step 6: (Optional) Customize Python Packages 🐍
If you use Python, check python/requirements.txt. Add or remove libraries you want installed by default.
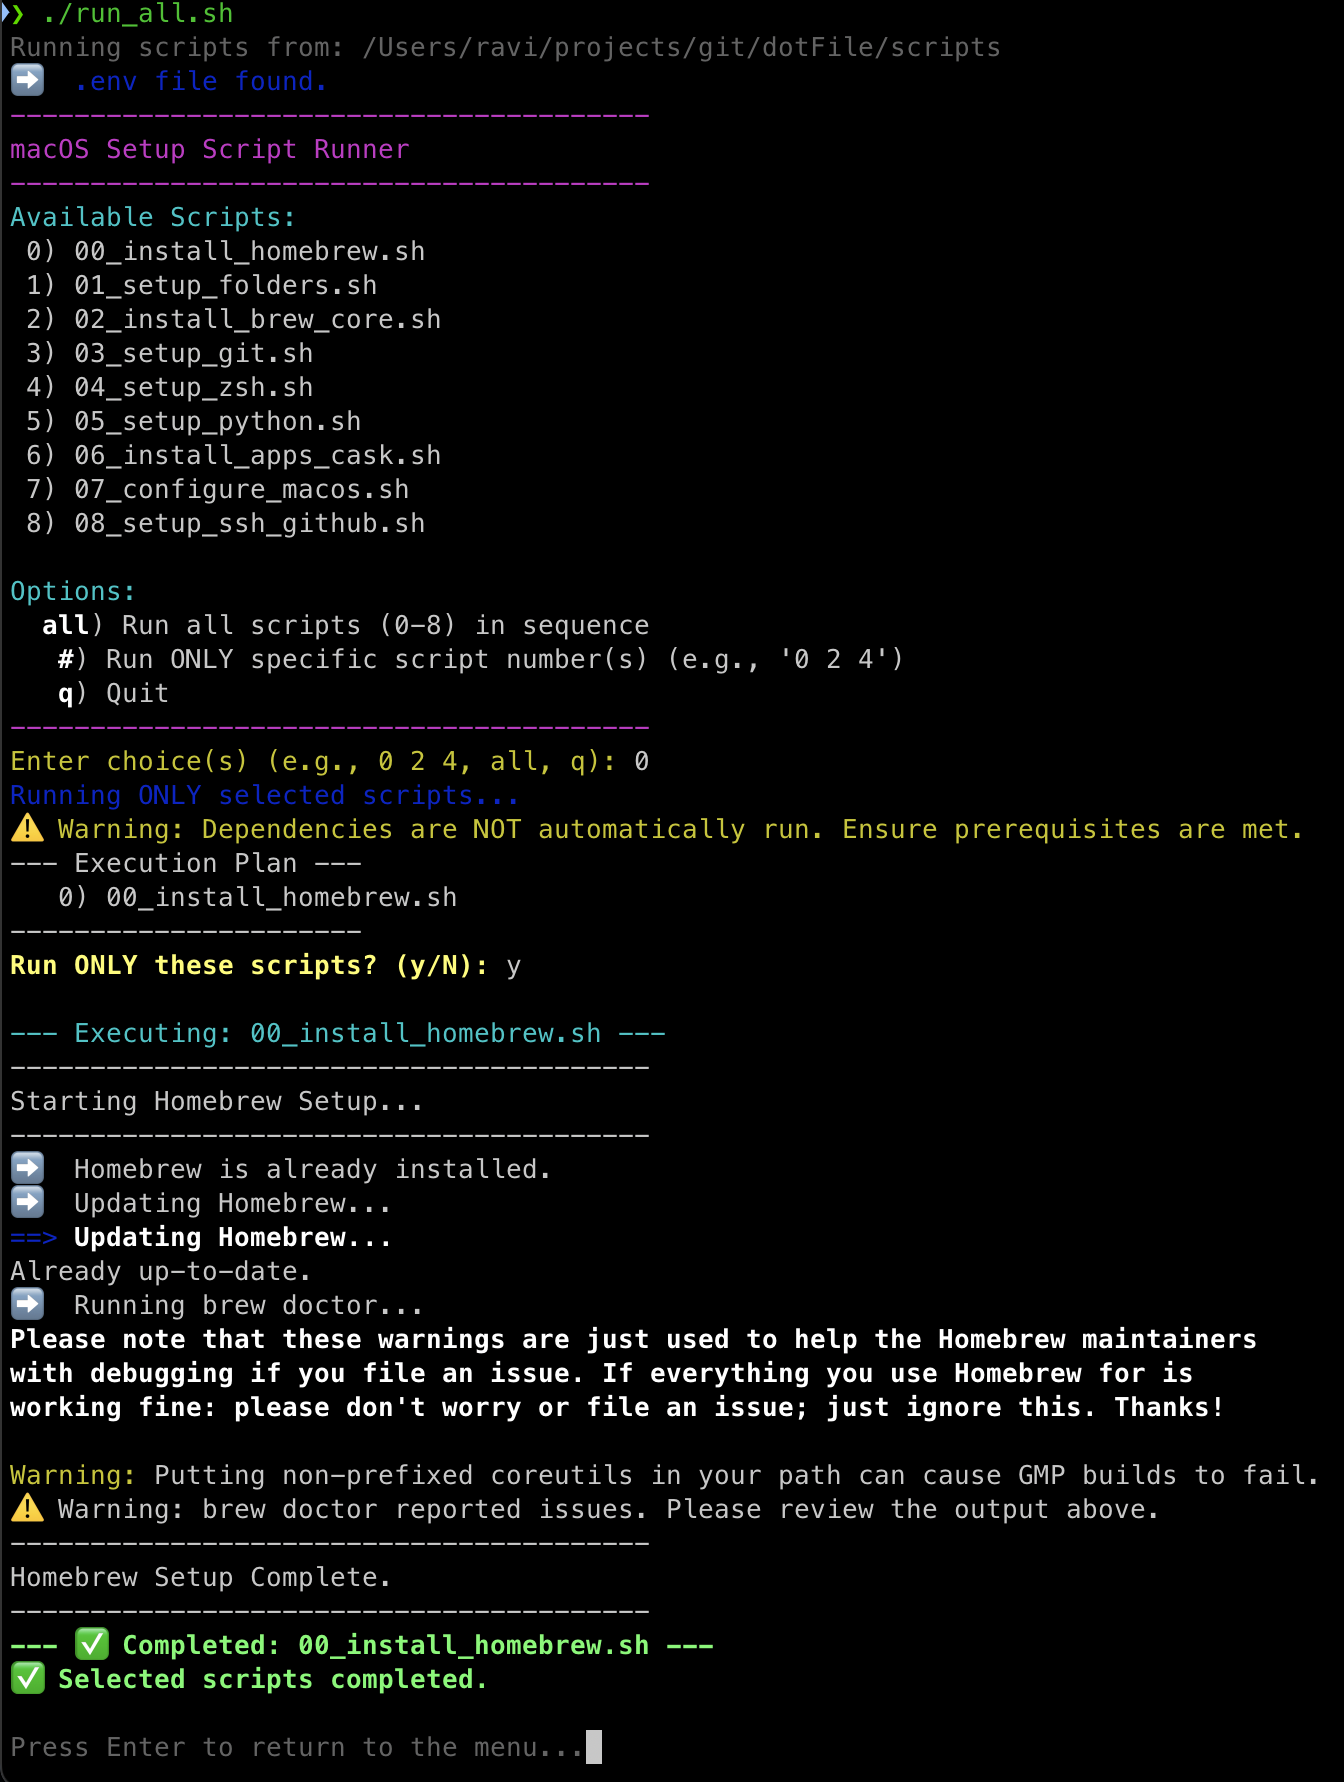
Step 7: Run the Setup Script ✨ (run_all.sh)
-
Navigate to Script Directory:
# Use the path where you cloned the repo cd ~/projects/git/dotFile/scripts -
Execute
run_all.sh: Choose a mode:- Interactive Mode (Select Scripts): Shows a menu to choose specific scripts (0-8) or
all. Warning: Selecting individual scripts runs only those scripts; dependencies are NOT automatically included. Use with caution.bash run_all.sh
- Interactive Mode (Select Scripts): Shows a menu to choose specific scripts (0-8) or
-
Follow Prompts: Enter your
sudopassword and potentially your user password (chsh) when requested. -
Wait: Installation takes time.
Final Steps After Installation 🏁
- Restart Your Terminal: Quit Terminal completely (
Cmd+Q) and reopen it. This ensures all settings are applied. - Add SSH Key to GitHub: If script
08ran, copy the public key it printed and add it to your GitHub account settings online.- Copy your public SSH key:
cat ~/.ssh/id_ed25519.pub - Add it to your GitHub account:
Settings > SSH and GPG keys > New SSH key.
- Copy your public SSH key:
- Log into Apps: Open and sign into apps like Docker, Dropbox, and Google Drive.
- Explore Your Setup: Start using tools like Conda, Git, and Zsh plugins. Customize VS Code and other tools as needed.
You're all set! Enjoy your streamlined Mac development environment. 🎉
Core Tools & Setup
User Guide: Managing Software with Homebrew 🍺
Homebrew is like an App Store for your terminal. It makes installing, updating, and removing software easy. Whether you need command-line tools or Mac apps, Homebrew handles it all without dragging .dmg files around.
What Can Homebrew Do? 🤔
Homebrew installs two types of software:
- Formulas: Command-line tools like
git,python, ortree. These tools run in the terminal.- Install with:
brew install <formula_name>
- Install with:
- Casks: Mac apps like Google Chrome, VS Code, or Spotify. These apps appear in your
/Applicationsfolder.- Install with:
brew install --cask <cask_name>
- Install with:
Everyday Homebrew Commands 🚀
Here are the most common commands you'll use:
1. Keep Homebrew Updated
- Update Homebrew's Catalog: Refresh the list of available software.
brew update - Upgrade Installed Software: Update all tools and apps installed via Homebrew.
brew upgrade - Do Both Together:
brew update && brew upgrade
2. Install Software
- Install a Command-Line Tool (Formula):
brew install <formula_name> # Examples: brew install tree # Shows directory structures brew install htop # Advanced activity monitor brew install jq # Processes JSON data - Install a Mac App (Cask):
brew install --cask <cask_name>
# Examples:
brew install --cask firefox         # Installs Firefox browser
brew install --cask slack           # Installs Slack messaging app
brew install --cask rectangle       # Installs Rectangle window manager
3. Manage Installed Software
- See What's Installed:
brew list # Lists installed command-line tools brew list --cask # Lists installed Mac apps - Get Info About a Package:
brew info <formula_name> brew info --cask <cask_name> # Examples: brew info git brew info --cask visual-studio-code - Uninstall Software:
brew uninstall <formula_name>
brew uninstall --cask <cask_name>
# Examples:
brew uninstall tree
brew uninstall --cask firefox
4. Clean Up
- Remove Old Files: Free up disk space by deleting old versions of software.
brew cleanup- Example Output:
Removing: /opt/homebrew/Cellar/node/18.15.0... (X files, Y MB)
==> Pruning caches
Removed X files and Y MB
- Example Output:
5. Troubleshooting
- Check for Problems: If something isn't working, run this command. It often tells you how to fix issues.
brew doctor- Example Output:
Your system is ready to brew.
- Example Output:
6. Manage Background Services
Some tools (like databases) can run in the background.
- List Services:
brew services list - Start a Service:
brew services start <service_name> # Example: brew services start redis - Stop a Service:
brew services stop <service_name> - Restart a Service:
brew services restart <service_name>
Searching for Software 🔍
Not sure if Homebrew has what you need? Search for it:
brew search <keyword>
# Examples:
brew search mysql        # Search for MySQL database
brew search image editor # Search for image editing tools/apps
brew search node         # Search for Node.js
Pro Tip: Run Updates Regularly
Keep your tools fresh by running:
brew update && brew upgrade
Homebrew makes managing software on your Mac simple and efficient. Dive in and explore!
Beginner's Guide: Git & GitHub Workflow
Git is like a "time machine" for your projects. It saves snapshots (called commits) of your work, so you can go back to earlier versions or track changes. GitHub is an online platform where you can store these snapshots, share them, and collaborate with others.
This guide will walk you through the basics of using Git and GitHub step by step.
Key Concepts
Here are the essential terms you need to know:
- Repository (Repo): A project folder tracked by Git. It contains your files and a hidden
.gitfolder where Git stores the history. - Commit: A saved snapshot of your project. You decide when to take a snapshot and add a message describing the changes.
- Branch: A separate line of work. Think of the
mainbranch as the trunk of a tree. You can create branches (like limbs) to work on features without affecting the trunk. - Stage (Add): Preparing specific changes for your next snapshot (commit). Think of it as putting items in a box before taking a photo.
- Push: Uploading your local snapshots (commits) to GitHub.
- Pull: Downloading updates from GitHub to your computer.
- Remote: A connection to a repo hosted online (e.g., GitHub). The default name is usually
origin.
Setting Up Git & GitHub
- Install Git: Download and install Git from git-scm.com.
- Configure Git: Set your name and email (used in commits).
git config --global user.name "Your Name" git config --global user.email "[email protected]" - Set Up SSH Key: This allows secure, password-free communication with GitHub.
- Generate an SSH key:
ssh-keygen -t ed25519 -C "[email protected]" - Copy the public key:
cat ~/.ssh/id_ed25519.pub - Add it to GitHub: Go to Settings > SSH and GPG keys > New SSH key, paste the key, and save.
- Generate an SSH key:
Basic Git Workflow
Follow these steps to make changes to a project and upload them to GitHub:
-
Navigate to Your Project:
cd ~/Projects/git/my-cool-project -
Check the Status:
git statusExample Output (if no changes):
On branch main nothing to commit, working tree clean -
Make Changes: Edit a file (e.g.,
README.md) in your editor and save it. -
Check Status Again:
git statusExample Output (after editing):
Changes not staged for commit: modified: README.md -
Stage Your Changes:
git add README.mdTo stage all changes:
git add . -
Commit Your Changes:
git commit -m "Update README with project details" -
Push to GitHub:
git push -
Pull Updates (if needed):
git pull
Working with Branches
Branches let you work on new features without affecting the main project.
-
Create & Switch to a New Branch:
git checkout -b new-feature -
Work & Commit: Make changes, stage them (
git add .), and commit (git commit -m "Add feature"). -
Switch Back to Main:
git checkout main -
Merge Your Branch:
git merge new-feature -
Push Changes:
git push -
Delete the Branch (Optional):
git branch -d new-feature
git push origin --delete new-feature
Tips for Success
- Use
git statusoften to see what’s happening. - Write clear commit messages to explain your changes.
- Always pull updates (
git pull) before starting new work to avoid conflicts.
Git is a powerful tool, and this guide covers the basics to get you started. Happy coding!
User Guide: Using Your Zsh Shell Superpowers ✨
Your Mac's terminal isn't just a black box anymore! It's running Zsh (Z Shell), turbocharged with Oh My Zsh (a configuration manager), the Powerlevel10k theme (for that cool prompt!), and some handy plugins. Think of it as upgrading your car's engine and dashboard.
Your Smart Prompt (Powerlevel10k) 📟
That colorful line where you type commands? It's packed with useful information:
- 📍 Current Directory: Shows where you are in your file system (e.g.,
~/Projects/my-app). - 🌱 Git Status: If you're in a Git project folder, it shows:
- The current branch name (e.g.,
main,feature-branch). - Symbols indicating changes:
?- Untracked files (new files not added to Git yet).!- Modified files (files you’ve changed but not staged).+- Staged files (files ready to commit).- Arrows - Whether your branch is ahead or behind the remote branch.
- The current branch name (e.g.,
- 🐍 Python Environment: Displays the name of the active Python/Conda environment (e.g.,
(my_env)). - ✅ / ❌ Command Status: Shows whether your last command succeeded (✅) or failed (❌).
Customize Your Prompt
Want to change how your prompt looks? Run this command in your terminal:
p10k configure
Follow the wizard to customize your prompt. Your choices are saved in ~/.p10k.zsh (linked from dot/.p10k.zsh).
Zsh Plugins: Your Terminal Assistants 🤖
Plugins add extra features to your terminal. Your dot/.zshrc file enables these plugins by default:
1. git Plugin
This plugin makes working with Git faster by providing shortcuts (aliases) for common commands. Here are some examples:
gst→git status(Check the status of your repository.)ga→git add(Stage changes for commit.)gcmsg→git commit -m(Commit changes with a message.)gp→git push(Push your changes to the remote repository.)gl→git pull(Pull the latest changes from the remote repository.)gco→git checkout(Switch branches.)
For example:
$ gst
# Shows the status of your Git repository.

$ ga file.txt
# Stages 'file.txt' for commit.

$ gcmsg "Added new feature"
# Commits the staged changes with the message "Added new feature."
2. zsh-autosuggestions
This plugin predicts the command you're typing based on your history and shows it as a faint suggestion.
Example:
$ git c                                # You type this
$ git commit -m "Initial commit"       # Faint suggestion appears
Actions:
- To Accept the Suggestion: Press the Right Arrow key (→) or
Endkey. - To Ignore the Suggestion: Keep typing your intended command. The suggestion will disappear or change.
3. zsh-syntax-highlighting
This plugin highlights your commands as you type, helping you catch errors before running them.
Examples:
-
Valid Command:
$ git status # 'git' is green (valid command), 'status' might be green/white. -
Invalid Command:
$ gti # 'gti' appears red (command not found). -
Command with Arguments:
$ echo "Hello World"
# 'echo' is green (valid command), "Hello World" is yellow (string).
This visual feedback helps you avoid typos and mistakes.
4. autojump (j)
This plugin lets you jump to frequently visited directories with a single command.
How It Works:
autojump remembers directories you’ve visited before. Instead of typing a long cd command, you can use a keyword to jump to the directory.
Example:
If you often go to this directory:
cd ~/Projects/Clients/SuperCorp/WebsiteProject/src/css
You can simply type:
j css
or:
j Website
autojump will take you to the most likely match based on your history.
Check Learned Directories:
To see which directories autojump remembers, run:
j --stat
Example output:
10.0: /Users/you/Projects/dotFile
25.5: /Users/you/Downloads
31.2: /Users/you/Projects/WebsiteProject/src/css
-------------------------------------------------
Total weight: 66.7. Total entries: 3.
(Higher weight means you visit it more often.)
Ensuring Plugins Are Enabled
To make sure these plugins are active, check the plugins=(...) line in your dot/.zshrc file. It should include:
plugins=(git zsh-autosuggestions zsh-syntax-highlighting autojump)
Additional Tips for Beginners
Reload Your Zsh Configuration
If you make changes to your dot/.zshrc file, reload it without restarting your terminal:
source ~/.zshrc
Learn More About Plugins
Each plugin has its own set of features. Check their documentation for more advanced usage:
These features make your terminal faster, smarter, and easier to use. Enjoy your Zsh superpowers! 🚀
User Guide: Your Terminal Command Center (iTerm2) 💻
The terminal is your tool for controlling your Mac using text commands. Forget clicking menus – here, you type! This guide focuses on iTerm2, a powerful and customizable alternative to the basic Mac Terminal.app. Inside iTerm2, your shell (configured as Zsh) helps you run commands efficiently.
Why Use iTerm2? 🤔
iTerm2 makes working in the terminal easier and more productive with features like:
- Tabs: Open multiple terminal sessions in one window (
Cmd + Tfor a new tab). - Panes: Split a single tab into multiple sections to run commands side-by-side (
Cmd + Dfor vertical split,Cmd + Shift + Dfor horizontal split). - Custom Looks: Change colors, fonts, and transparency to suit your style (
Cmd + ,to open settings). - Search: Quickly find text in your terminal output (
Cmd + F). - Profiles: Save different settings for different tasks.
How to Open iTerm2 🚀
You can launch iTerm2 just like any other app:
- Spotlight Search: Press
Cmd + Space, typeiTerm, and press Enter. - Applications Folder: Open
/Applicationsand double-clickiTerm.
Understanding the iTerm2 Window 👀
Here’s what you’ll see when you open iTerm2:
- The Prompt: This is where you type commands. It usually ends with
$. Your Powerlevel10k prompt shows helpful info like your current folder and Git status:
(In this example, the user╭─ ravi@Raviss-MacBook-Pro ~/Projects/dotFile (main ✔) ╰─ $ _raviis in the folder~/Projects/dotFile, on the Git branchmainwith no changes (✔), ready to type a command ($).) - Cursor: The blinking underscore
_or block shows where your typing will appear. - Tabs: Like browser tabs, they let you open multiple terminal sessions (
Cmd + Tfor new,Cmd + Wto close). - Panes: Split your terminal into sections to multitask:
Cmd + D: Split the current pane vertically.Cmd + Shift + D: Split the current pane horizontally.Cmd + ]orCmd + [: Switch between panes.Cmd + W: Close the current pane.
Basic Commands and Shortcuts ⌨️
Here are some essential commands and shortcuts to get started:
Running Commands
- Execute: Type a command (e.g.,
ls -lhaorpwd) and press Enter. - Stop a Command: If a command is stuck, press
Ctrl + Cto interrupt it.
Navigating and Autocompleting
-
Tab Completion: Start typing a command, file, or folder name, then press
Tab:- If there’s one match, it completes automatically.
- If there are multiple matches, it shows a list. Press
Tabagain to cycle through them. - Example: Type
cd Projand pressTab. It might complete tocd Projects/.
-
Command History:
- Use the Up Arrow to see previous commands.
- Use the Down Arrow to move forward in history.
- Press
Ctrl + R, then type part of an old command to search your history. Press Enter to run it orCtrl + Cto cancel.
Clearing the Screen
Ctrl + L: Clears the visible terminal screen (scroll up to see previous output).Cmd + K: Clears the entire scrollback buffer (everything above is gone).clear: Typing this and pressing Enter does the same asCtrl + L.
Copying and Pasting
- Copy: Select text with your mouse. In iTerm2, selecting text usually copies it automatically (check settings). Otherwise, use
Cmd + C. - Paste: Press
Cmd + V.
Practice and Explore! 🎉
The terminal is a powerful tool once you get the hang of it. Start with these basics, and don’t be afraid to experiment (safely). For more commands, check out the "Basic Terminal Commands" guide.
User Guide: Custom Shell Aliases & Functions 🛠️
Make your terminal work for you! Zsh allows you to create aliases (short nicknames for long commands) and functions (mini-scripts for complex tasks). This saves typing and makes repetitive actions much faster.
Your setup organizes these customizations in files within your dot/ repository folder, which are then linked to your home directory (~) and loaded automatically by Zsh.
What are "Dotfiles" Again?
They are configuration files usually starting with a . (like .zshrc, .gitconfig). Your setup keeps yours neatly in the dot/ folder of your dotFile repository (e.g., ~/Projects/git/dotFile/dot/). This is great because you can track changes to your configuration using Git!
Aliases: Your Command Nicknames (dot/.aliases)
An alias is just a shortcut. Instead of typing a long command repeatedly, you type its short alias.
- Why use them? Save keystrokes, remember complex options easily.
- Where to define them? In your
dot/.aliasesfile. (Make sure your maindot/.zshrcfile actually loads this! It might have a line likesource ~/.aliasesor[ -f ~/.aliases ] && source ~/.aliases). - Syntax:
alias nickname="your_long_command --with --options"- No spaces around the
=. - Use double quotes (
") around the command.
- No spaces around the
- Examples (Add these to
dot/.aliases):# --- Navigation --- alias ..="cd .." alias ...="cd ../.." alias ....="cd ../../.." alias home="cd ~" alias proj="cd ~/Projects/git" # Adjust to your GIT_HOME! # --- Listing Files (using enhanced ls/gls if available) --- # Basic ls with colors (macOS default) # alias ls='ls -G' # OR, if you installed 'coreutils' with Homebrew (provides 'gls'): alias ls='gls --color=auto -F' # Use GNU ls with colors and type indicators (/) alias ll='ls -al' # Long format, all files, human sizes from ls alias alias la='ls -A' # List all except . and .. # --- Git --- (Oh My Zsh git plugin adds many, but here are more) alias glog="git log --graph --pretty=format:'%Cred%h%Creset -%C(yellow)%d%Creset %s %Cgreen(%cr) %C(bold blue)<%an>%Creset' --abbrev-commit" alias gaa='git add --all' alias gb='git branch' alias gba='git branch -a' alias gd='git diff' alias gds='git diff --staged' # --- System --- alias update='echo "Updating macOS..."; sudo softwareupdate -i -a; echo "Updating Homebrew..."; brew update && brew upgrade; echo "Cleaning up Brew..."; brew cleanup; echo "Checking Brew Doctor..."; brew doctor' # Multi-step update alias cl='clear' alias ip='ipconfig getifaddr en0 || ipconfig getifaddr en1' # Show local IP alias ports='sudo lsof -i -P | grep LISTEN' # Show open network ports # --- Docker --- alias dps='docker ps' alias dpsa='docker ps -a' alias di='docker images' alias dprune='docker system prune -af' # Prune all Docker stuff forcefully (Careful!) - How to Use: Just type the alias (e.g.,
ll,proj,update) and press Enter. - See All Aliases: Type
aliasin the terminal. - Activate Changes: After editing
dot/.aliases, close and reopen your terminal tab/window OR runsource ~/.aliasesin your current session.
Functions: Your Mini-Scripts (dot/.functions)
Functions are more powerful than aliases. They can take inputs (arguments), run multiple commands, use logic (like if/else), and create temporary variables.
- Why use them? Automate multi-step tasks, create smarter custom commands.
- Where to define them? In your
dot/.functionsfile. (Again, make suredot/.zshrcloads it, e.g.,source ~/.functions). - Syntax:
# Preferred multi-line format function_name() { echo "Starting function..." # Use $1 for the first argument, $2 for second, etc. # Use $@ to refer to all arguments ls -l "$1" # Example: list details of the first argument echo "Finished." # return 0 # Optional: Indicate success } # Short one-liner format short_func() { command1 && command2; } - Examples (Add these to
dot/.functions):# Create a directory and cd into it mcd() { mkdir -p "$1" && cd "$1" || return 1 # Added error check echo "Created and entered directory: $1" } # Backup a file with timestamp bak() { local timestamp=$(date +%Y%m%d_%H%M%S) cp "$1" "$1.${timestamp}.bak" && echo "Backed up '$1' to '$1.${timestamp}.bak'" } # Search command history easily hgrep() { history | grep "$@" } # Start a simple Python HTTP server in the current directory serve() { local port="${1:-8000}" # Use port 8000 by default, or first argument if given echo "Serving current directory on http://localhost:${port}" python -m http.server "$port" } # Git add, commit, push (use with care!) gacp() { if [ -z "$1" ]; then echo "❌ Error: Commit message is required." echo "Usage: gacp \"Your commit message\"" return 1 # Indicate error fi git add . && git commit -m "$1" && git push } - How to Use: Type the function name, optionally followed by arguments, then press Enter.
mcd my_cool_projectbak important_notes.txthgrep brew install(searches history for lines containing "brew install")serve 9090(starts server on port 9090)gacp "Implement user login"
- Activate Changes: Same as aliases - restart the terminal or run
source ~/.functions.
Customize these files to match your workflow! Keep them organized and add comments (#) to explain what your aliases and functions do. Don't forget to git add, git commit, and git push changes in your dotFile repository to save your awesome customizations!
Development Environments
User Guide: Managing Python with Conda (Miniconda)
Conda helps you manage Python versions and libraries for different projects by creating environments. Each environment is like a separate toolbox, keeping everything organized and conflict-free.
Why Use Conda? 🤔
- Separate Environments: Each project gets its own Python version and libraries.
- Avoid Conflicts: Project A needing
Library v1.0won't break Project B needingLibrary v2.0. - Rule #1: Always create a new environment for each project. Avoid installing project-specific tools in the default
(base)environment.
Quick Start: Create Your First Environment 🚀
Let’s create an environment for a web project using Flask.
- Open Your Terminal: Launch iTerm2.
- Create the Environment: Name it
flask_projectand use Python 3.11.conda create --name flask_project python=3.11- Conda will list the packages it needs to install. Type
yand press Enter.
- Conda will list the packages it needs to install. Type
- Activate the Environment: Step into your new environment.
conda activate flask_project- Your prompt will now show
(flask_project), indicating the environment is active.
- Your prompt will now show
- Install Libraries: Use
pipto install Flask.pip install Flask - Work on Your Project: Create and run your Python files.
touch app.py python app.py - Deactivate the Environment: Exit when you're done.
conda deactivate
Essential Conda Commands Cheat Sheet 📝
- List Environments:
conda env list- Example Output:
base                  * /opt/homebrew/Caskroom/miniconda/base
flask_project            /opt/homebrew/Caskroom/miniconda/base/envs/flask_project
- Example Output:
- Create an Environment:
conda create --name <env_name> python=<version> # Example: conda create --name data_sci python=3.10 - Activate an Environment:
conda activate <env_name> - Deactivate an Environment:
conda deactivate - Install a Package:
conda install <package_name> # Example: conda install numpy pandas matplotlib - Remove an Environment:
conda env remove --name <env_name> - Export Environment to File:
conda env export > environment.yml - Create Environment from File:
conda env create -f environment.yml
Conda makes managing Python projects simple and organized. Start creating environments and enjoy hassle-free development!
Docker User Guide: Cleaning Up Unused Resources 🐳🧹
Docker is a powerful tool for running applications in isolated "containers". However, over time, it can fill up your disk with unused files like old images, stopped containers, and more. This guide will show you how to clean up Docker safely and effectively.
Why Clean Up Docker? 🗑️
When you use Docker, it creates and stores various resources. Over time, these can take up a lot of space:
- Stopped Containers: Containers you ran but stopped still take up space.
- Dangling Images: Images without tags or references, often leftover from builds.
- Unused Images: Images not used by any container (running or stopped).
- Unused Volumes: Persistent data storage created by containers you no longer use.
- Unused Networks: Custom networks created for containers that no longer exist.
- Build Cache: Temporary files created during image builds to speed up future builds.
How to Clean Up Docker 💡
Docker provides simple commands to clean up unused resources. Be careful—some commands permanently delete data. Always double-check before running them.
1. Clean Everything Safely: docker system prune
This is the most common and safest cleanup command. It removes:
- Stopped containers
- Unused networks
- Dangling images
- Build cache
Command:
docker system prune
Example:
$ docker system prune
WARNING! This will remove:
  - all stopped containers
  - all networks not used by at least one container
  - all dangling images
  - all build cache

Are you sure you want to continue? [y/N] y
2. Aggressive Cleanup: docker system prune -a
This removes everything the standard prune does, plus unused images (images not used by any container). Use this only if you're okay with re-downloading images later.
Command:
docker system prune -a
Example:
$ docker system prune -a
WARNING! This will remove:
  - all stopped containers
  - all networks not used by at least one container
  - all dangling images
  - all unused images
  - all build cache

Are you sure you want to continue? [y/N] y
3. Clean Specific Resources
If you want to clean up only one type of resource, use these commands:
-
Stopped Containers:
docker container prune(Example: Removes all stopped containers.)
-
Dangling Images:
docker image prune(Example: Removes images without tags or references.)
-
Unused Volumes: (Be careful—this deletes data!)
docker volume prune(Example: Removes volumes not attached to any container.)
-
Unused Networks:
docker network prune(Example: Removes networks not used by any container.)
-
Build Cache:
docker builder prune(Example: Removes temporary files from image builds.)
Check Disk Usage Before Cleaning 📊
Want to see how much space Docker is using before cleaning? Use this command:
Command:
docker system df
Example:
$ docker system df
TYPE            TOTAL     ACTIVE    SIZE      RECLAIMABLE
Images          10        3         5.2GB     3.1GB (60%)
Containers      5         1         1.2GB     1.0GB (83%)
Local Volumes   8         2         2.5GB     2.0GB (80%)
Build Cache     -         -         1.0GB     1.0GB
Quick Tips for Beginners 📝
- Start with
docker system prune: It's the safest and easiest way to clean up. - Use
docker system dffirst: Check what’s taking up space before deleting anything. - Be cautious with
-aand volume pruning: These commands can delete data you might need later. - Run cleanup regularly: Keeping Docker tidy helps avoid running out of disk space.
Happy Docker-ing! 🐳✨
Redis Cheatsheet for macOS 🍎
Redis is a powerful in-memory datastore widely used for caching, pub/sub messaging, and more. This guide provides quick commands and tips for installing, managing, and using Redis on macOS.
Quick Tips
- Default Port: Redis runs on port
6379by default. - Logs Location: Check logs for debugging in
/usr/local/var/log/redis.log. - Configuration File: The default configuration file is located at
/usr/local/etc/redis.conf. - Access Control: Use the ACL Guide to configure users and permissions.
- Stop Redis Safely: Always stop Redis using
brew services stop redisorredis-cli shutdownto avoid data loss. - Redis CLI Help: Run
redis-cli --helpto see all available commands.
Useful Commands
Connect to Redis
redis-cli -h <host> -p <port>
Ping Redis
Check if Redis is running:
redis-cli ping
# Output: PONG
List Users
redis-cli ACL LIST
Monitor Commands
Log all commands received by Redis in real-time:
> redis-cli monitor
OK
1590445706.871636 [0 127.0.0.1:52583] "ping"
1590445716.910679 [0 127.0.0.1:52642] "flushall"
1590445814.170701 [0 127.0.0.1:53107] "incr" "visitor"
1590445893.336228 [0 127.0.0.1:53483] "publish" "channel" "hi"
1590445914.672421 [0 127.0.0.1:53591] "subscribe" "channel1"
1590445925.539757 [0 127.0.0.1:53639] "publish" "channel" "hey"
View Continuous Stats
> redis-cli --stat
------- data ------ --------------------- load -------------------- - child -
keys       mem      clients blocked requests            connections
1          1.02M    1       0       0 (+0)              1
1          1.02M    1       0       1 (+0)              1
1          1.02M    1       0       2 (+1)              1
1          1.02M    1       0       3 (+1)              1
1          1.02M    1       0       4 (+1)              1
Flush All Data
Clear all keys in the current database:
redis-cli flushall
Increment a Key
redis-cli incr <key>
Publish a Message
Send a message to a channel:
redis-cli publish <channel> <message>
Installation
Install Redis via Homebrew
The easiest way to install Redis on macOS is using Homebrew:
brew install redis
Starting and Stopping Redis
Start Redis as a Foreground Process
Run the Redis server in the foreground:
 > redis-server

15594:C 25 May 2020 18:08:37.005 # oO0OoO0OoO0Oo Redis is starting oO0OoO0OoO0Oo
15594:C 25 May 2020 18:08:37.005 # Redis version=6.0.3, bits=64, commit=00000000, modified=0, pid=15594, just started
15594:C 25 May 2020 18:08:37.005 # Warning: no config file specified, using the default config. In order to specify a config file use redis-server /path/to/redis.conf
15594:M 25 May 2020 18:08:37.006 * Increased maximum number of open files to 10032 (it was originally set to 8192).
                _._
           _.-``__ ''-._
      _.-``    `.  `_.  ''-._           Redis 6.0.3 (00000000/0) 64 bit
  .-`` .-```.  ```\/    _.,_ ''-._
 (    '      ,       .-`  | `,    )     Running in standalone mode
 |`-._`-...-` __...-.``-._|'` _.-'|     Port: 6379
 |    `-._   `._    /     _.-'    |     PID: 15594
  `-._    `-._  `-./  _.-'    _.-'
 |`-._`-._    `-.__.-'    _.-'_.-'|
 |    `-._`-._        _.-'_.-'    |           http://redis.io
  `-._    `-._`-.__.-'_.-'    _.-'
 |`-._`-._    `-.__.-'    _.-'_.-'|
 |    `-._`-._        _.-'_.-'    |
  `-._    `-._`-.__.-'_.-'    _.-'
      `-._    `-.__.-'    _.-'
          `-._        _.-'
              `-.__.-'

15594:M 25 May 2020 18:08:37.007 # Server initialized
15594:M 25 May 2020 18:08:37.008 * Ready to accept connections
- To exit: Press
Ctrl + C.
Start/Stop Redis as a Background Service
Use Homebrew services to manage Redis as a background service:
brew services start redis   # Start Redis
brew services stop redis    # Stop Redis
brew services restart redis # Restart Redis
Check Running Services
List all services managed by Homebrew:
brew services list
Configuration
Edit Redis Configuration
To customize Redis settings, edit the configuration file:
/usr/local/etc/redis.conf
- After making changes, restart Redis:
brew services restart redis
For more details on configuration, see the Redis Configuration Guide.
Useful Aliases
Add these aliases to your ~/.zshrc or ~/.bash_profile for quick Redis management:
alias redis-start="brew services start redis"
alias redis-stop="brew services stop redis"
alias redis-restart="brew services restart redis"
alias redis-monitor="redis-cli monitor"
Redis is now ready to supercharge your development workflow! 🚀 For more commands and advanced usage, check the Redis CLI Documentation.
🦀 Rust Essentials Guide
Rust is a modern systems programming language focused on safety, speed, and concurrency. This guide covers the absolute basics to get you started after installation.
Installation (via rustup - Recommended)
The officially recommended way to install and manage Rust versions is using rustup, the Rust toolchain installer. The setup script 09_install_rust.sh in this repository uses this method.
# Installs rustup, Rust compiler (rustc), package manager (cargo), etc.
# The '-y --no-modify-path' flags run non-interactively; remove them for interactive install.
curl --proto '=https' --tlsv1.2 -sSf [https://sh.rustup.rs](https://sh.rustup.rs) | sh -s -- -y --no-modify-path
After installation, you need to ensure Cargo's bin directory is in your shell's PATH. rustup typically adds this configuration to your shell profile (.zshrc, .bash_profile, etc.), but you might need to restart your shell or run the following command in your current session:
# Source the cargo environment script (if it exists)
if [ -f "$HOME/.cargo/env" ]; then
    source "$HOME/.cargo/env"
fi

# Alternatively, manually add to PATH (add this line to your .zshrc or equivalent)
# export PATH="$HOME/.cargo/bin:$PATH"
rustup makes it easy to update Rust (rustup update) and manage different toolchains (stable, beta, nightly) if needed.
Verify installation:
# Check if the commands are available and output their versions
rustc --version
cargo --version
If the commands are not found, double-check that $HOME/.cargo/bin is correctly added to your PATH and that you've restarted your terminal or sourced the relevant profile file.
Cargo: The Rust Build Tool and Package Manager
Cargo handles many common tasks for Rust projects:
- Building your code (
cargo build) - Running your code (
cargo run) - Running tests (
cargo test) - Checking code without building (
cargo check) - Building documentation (
cargo doc) - Publishing libraries (
cargo publish) - Managing dependencies (via
Cargo.toml)
Creating a New Project
# Create a new binary (application) project
cargo new hello_world
cd hello_world

# Create a new library project
# cargo new my_library --lib
This creates a standard project structure:
hello_world/
├── Cargo.toml  # Manifest file (metadata, dependencies)
└── src/        # Source code directory
    └── main.rs # Main source file for binaries
Building and Running (Cheatsheet)
cargo check- Quickly check code for errors without full compilation.
cargo check
cargo build- Compile project (debug build).
- Output:
./target/debug/<project_name> cargo build
cargo build --release- Compile project (optimized release build).
- Output:
./target/release/<project_name> cargo build --release
cargo run- Compile (if needed) and run project (debug build).
cargo run- Run release build:
cargo run --release
Cargo.toml - The Manifest File
This file describes your project (called a "crate" in Rust):
[package]
name = "hello_world" # Crate name
version = "0.1.0"    # Semantic version
edition = "2021"     # Rust edition (usually latest)

# See more keys and definitions at [https://doc.rust-lang.org/cargo/reference/manifest.html](https://doc.rust-lang.org/cargo/reference/manifest.html)

[dependencies]
# Add external libraries (crates) here
# Example: rand = "0.8.5"
Rust Language Basics
Variables and Mutability
Variables are immutable by default. Use mut to make them mutable.
fn main() {
    let x = 5; // Immutable
    // x = 6; // This would cause a compile error!

    let mut y = 10; // Mutable
    println!("Initial y: {}", y);
    y = 11;
    println!("Modified y: {}", y);

    // Constants (must have type annotation, always immutable)
    const THREE_HOURS_IN_SECONDS: u32 = 60 * 60 * 3;
    println!("Constant: {}", THREE_HOURS_IN_SECONDS);
}
Basic Data Types
Rust is statically typed, but the compiler can often infer types.
- Integers:
i8,u8,i16,u16,i32,u32,i64,u64,i128,u128,isize,usize(signedi/ unsignedu, size depends on architecture forisize/usize).#![allow(unused)] fn main() { let guess: u32 = "42".parse().expect("Not a number!"); let count = 100_000; // Use _ for readability } - Floating-Point:
f32,f64(default).#![allow(unused)] fn main() { let pi = 3.14159; // f64 by default let temp: f32 = 98.6; } - Booleans:
bool(trueorfalse).#![allow(unused)] fn main() { let is_active = true; let has_permission: bool = false; } - Characters:
char(single Unicode scalar value, use single quotes).#![allow(unused)] fn main() { let grade = 'A'; let emoji = '🦀'; } - Tuples: Fixed-size collection of potentially different types.
#![allow(unused)] fn main() { let tup: (i32, f64, char) = (500, 6.4, 'z'); let (x, y, z) = tup; // Destructuring println!("The value of y is: {}", y); // Access via destructuring println!("First element: {}", tup.0); // Access via index } - Arrays: Fixed-size collection of the same type. Stored on the stack.
#![allow(unused)]
fn main() {
let numbers: [i32; 5] = [1, 2, 3, 4, 5];
let first = numbers[0];
// let invalid = numbers[10]; // Compile error or runtime panic!
println!("First number: {}", first);
}
Functions
Defined using the fn keyword. Type annotations for parameters are required. Return type is specified after ->.
fn main() {
    println!("Hello from main!");
    another_function(5, 'h');
    let sum = add_five(10);
    println!("10 + 5 = {}", sum);
}

// Function with parameters
fn another_function(value: i32, unit_label: char) {
    println!("The measurement is: {}{}", value, unit_label);
}

// Function with a return value
// The last expression in the function is implicitly returned (no semicolon)
// Or use the `return` keyword explicitly.
fn add_five(x: i32) -> i32 {
    x + 5 // No semicolon means this is the return value
}
Control Flow
ifExpressions:#![allow(unused)] fn main() { let number = 6; if number % 4 == 0 { println!("number is divisible by 4"); } else if number % 3 == 0 { println!("number is divisible by 3"); } else { println!("number is not divisible by 4 or 3"); } // `if` is an expression, can be used in `let` statements let condition = true; let value = if condition { 5 } else { 6 }; println!("The value is: {}", value); }- Loops:
loop,while,for.#![allow(unused)] fn main() { // Infinite loop (use `break` to exit) let mut counter = 0; let result = loop { counter += 1; if counter == 10 { break counter * 2; // `break` can return a value } }; println!("Loop result: {}", result); // `while` loop let mut number = 3; while number != 0 { println!("{}!", number); number -= 1; } println!("LIFTOFF!!!"); // `for` loop (most common, iterates over collections) let a = [10, 20, 30, 40, 50]; // Ensure array is complete for element in a { println!("the value is: {}", element); } // For loop with a range ````markdown }
macOS Specifics
User Guide: Basic Mac Housekeeping 🧹✨
Keeping your Mac tidy and running smoothly doesn’t have to be complicated. Think of it like cleaning your room—just a few simple habits can make a big difference. Follow these steps to keep your Mac fast, secure, and clutter-free.
1. Keep Your Software Up-to-Date 🔄
Outdated software can slow down your Mac or leave it vulnerable to security issues. Here’s how to stay updated:
macOS Updates
- Click the Apple Menu () in the top-left corner of your screen.
- Select System Settings.
- Go to General > Software Update.
- Install any available updates.
Homebrew Updates (Command-Line Tools)
If you use Homebrew to install apps and tools, keep them updated regularly. Open your terminal (e.g., iTerm2 or Terminal) and run:
brew update && brew upgrade
brew update: Updates the list of available software.brew upgrade: Updates all installed tools and apps to the latest versions.
App Store Updates
- Open the App Store.
- Click Updates in the sidebar.
- Install any available updates for your apps.
Alternatively, if you use the mas command-line tool (installed via Homebrew), you can update App Store apps directly from the terminal:
mas outdated  # Lists apps with updates available
mas upgrade   # Updates all outdated apps
2. Clean Up Files and Free Up Space 💾
Digital clutter can slow down your Mac. Here’s how to keep things organized:
Homebrew Cleanup
After updating Homebrew, remove old versions of software to free up space:
brew cleanup
Example output:
Removing: /opt/homebrew/Cellar/git/2.40.0... (150 files, 45.2MB)
Organize Your Downloads Folder
The ~/Downloads folder often collects unnecessary files. Here’s what to do:
- Open the Downloads folder in Finder.
- Delete
.dmgfiles (disk images) after installing apps. - Remove old installers, zip files, or anything you no longer need.
- Move important files to proper folders like Documents or project-specific directories.
(Tip: Your Dock includes a stack for quick access to Downloads!)
Empty the Trash
Files you delete aren’t gone until you empty the Trash:
- Right-click (or Ctrl-click) the Trash icon in your Dock.
- Select Empty Trash.
Find Large Files
If you’re running out of space, find and delete large files:
- Open Finder and press
Cmd + Fto start a search. - Click the Kind dropdown and select Other....
- Search for File Size, check the box, and click OK.
- Set the search criteria to
File Size|is greater than|1|GB(or500 MB). - Select Search: This Mac to find large files.
Be careful not to delete system files! If unsure, leave it alone.
(Optional: Use a disk visualizer like GrandPerspective to see what’s taking up space: brew install --cask grandperspective.)
3. Check Your Mac’s Performance 🩺
If your Mac feels slow, here’s how to troubleshoot:
Use Activity Monitor
- Open Activity Monitor (search for it using
Cmd + Space). - Check the % CPU and Memory tabs.
- Sort by usage to see which apps are using the most resources.
- If an app is unresponsive, select it and click the X button to Force Quit. (Save your work first if possible!)
(Advanced users can use the htop command in the terminal for more details: sudo htop.)
Restart Regularly
Restarting clears temporary memory and gives your Mac a fresh start. Aim to restart once a week:
- Click the Apple Menu ().
- Select Restart....
Manage Login Items
Too many apps starting automatically can slow down your Mac:
- Go to System Settings > General > Login Items.
- Under Open at Login, remove apps you don’t need by selecting them and clicking the
-(minus) button.
4. Back Up Your Mac with Time Machine 🛡️
Backing up your Mac is essential to protect your data. Here’s how to set up Time Machine:
- Get an External Drive: Use a USB hard drive or SSD that’s at least 2-3 times the size of your Mac’s storage.
- Connect the Drive: Plug it into your Mac.
- Enable Time Machine:
- macOS should ask if you want to use the drive for Time Machine. Click Yes.
- If it doesn’t, go to System Settings > General > Time Machine, click Add Backup Disk..., and select your drive.
- Check Backups: Look for the Time Machine icon in the menu bar (top-right). Click it to see the last backup time or choose Back Up Now.
5. Keep Docker in Check (If You Use Docker) 🐳
Docker can take up a lot of disk space over time. Clean up unused containers, images, and volumes with this command:
docker system prune
(See the Docker guide for more details.)
6. Bonus Tips for a Happy Mac 😊
Keep Your Desktop Clean
A cluttered desktop can slow down your Mac. Move files into folders and keep only what you need visible.
Use Spotlight for Quick Searches
Press Cmd + Space to open Spotlight and quickly find files, apps, or even perform calculations.
Learn Keyboard Shortcuts
Shortcuts save time! Here are a few useful ones:
Cmd + Q: Quit an app.Cmd + W: Close a window.Cmd + Tab: Switch between open apps.Cmd + Shift + 4: Take a screenshot of a selected area.
By following these simple steps, you’ll keep your Mac running smoothly and efficiently. A little maintenance goes a long way—happy housekeeping! 🧹✨
Mac Keyboard Shortcut Cheat Sheet ⚡️
Boost your productivity by using keyboard shortcuts instead of reaching for the mouse! This guide is designed for beginners, with simple explanations and examples to help you get started.
Understanding Modifier Keys
Before diving into shortcuts, here’s a quick guide to the keys you’ll see in this cheat sheet:
Cmd(⌘): Command key (similar to Ctrl on Windows).Option(⌥): Option key (sometimes called Alt).Shift(⇧): Shift key.Ctrl(⌃): Control key (used in specific apps or the terminal).Fn: Function key (bottom-left on most Mac keyboards).
1. Application & Window Management
These shortcuts help you manage apps and windows efficiently:
Cmd + Q: Quit the active application.- Example: Close Safari completely when you’re done browsing.
Cmd + H: Hide the active application’s windows.- Example: Hide Mail while keeping it running in the background.
Cmd + Option + H: Hide all other applications except the active one.- Example: Focus on a single app like Word by hiding everything else.
Cmd + W: Close the active window or tab.- Example: Close a browser tab in Safari or Chrome.
Cmd + Option + W: Close all windows of the active application.- Example: Close all open Finder windows at once.
Cmd + M: Minimize the active window to the Dock.- Example: Minimize a document you’re working on in Pages.
Cmd + Tab: Switch between open applications.- Example: Quickly jump from Safari to Notes without using the mouse.
Cmd + ~(Tilde): Switch between windows of the same application.- Example: Switch between two open Word documents.
Cmd + ,(Comma): Open the Preferences/Settings for the active application.- Example: Open Safari’s settings to change your homepage.
Cmd + N: Open a new window or document.- Example: Open a new Finder window or create a new document in Word.
Cmd + T: Open a new tab (in apps that support tabs, like browsers or Finder).- Example: Open a new tab in Chrome to start a new search.
2. Finder (File Management)
Use these shortcuts to manage files and folders in Finder:
Cmd + Shift + N: Create a new folder.- Example: Create a folder named "Work Projects" in your Documents.
Enter: Rename the selected file or folder.- Example: Rename "Untitled Folder" to "Photos 2025."
Cmd + I: Get detailed information about a file or folder.- Example: Check the size of a video file.
Spacebar: Preview the selected file with Quick Look.- Example: Quickly view a PDF without opening it in Preview.
Cmd + Delete: Move selected items to the Trash.- Example: Delete old screenshots from your Downloads folder.
Cmd + Shift + Delete: Empty the Trash (asks for confirmation).Cmd + Option + Shift + Delete: Empty the Trash without confirmation (Be careful!).Cmd + D: Duplicate the selected file or folder.- Example: Make a copy of a document to create a backup.
Cmd + F: Open the search bar to find files.- Example: Search for "Invoices" in your Documents folder.
Cmd + [: Go back to the previous folder.Cmd + ]: Go forward to the next folder.Cmd + Up Arrow: Go to the parent folder.- Example: Move up from "Photos 2025" to the "Pictures" folder.
Cmd + Down Arrow: Open the selected folder or file.
3. Text Editing (Works Almost Everywhere!)
These shortcuts work in most text fields, from Word documents to web browsers:
Cmd + C: Copy selected text.Cmd + V: Paste copied text.Cmd + X: Cut selected text.Cmd + Z: Undo the last action.Cmd + Shift + Z: Redo the last undone action.Cmd + A: Select all text in the current field or document.Cmd + F: Find specific text in a document or webpage.- Example: Search for "budget" in a long report.
Cmd + S: Save the current document.Cmd + Left/Right Arrow: Move the cursor to the beginning or end of the current line.Option + Left/Right Arrow: Move the cursor one word at a time.Cmd + Up/Down Arrow: Move the cursor to the beginning or end of the entire document.- Add
Shiftto any of the above shortcuts to select text while moving.- Example:
Shift + Cmd + Right Arrowselects text from the cursor to the end of the line.
- Example:
Fn + Delete(orCtrl + D): Forward delete (deletes the character to the right of the cursor).
4. Screenshots 📸
Take screenshots with these shortcuts:
Cmd + Shift + 3: Capture the entire screen (saved to Desktop).Cmd + Shift + 4: Capture a selected area (drag crosshairs, saved to Desktop).Cmd + Shift + 4thenSpacebar: Capture a specific window (click the window, saved to Desktop).Cmd + Shift + 5: Open the Screenshot utility (options for area, window, or screen recording).- Add
Ctrlto any of the above shortcuts to copy the screenshot to the clipboard instead of saving it.- Example:
Ctrl + Cmd + Shift + 4lets you paste the screenshot directly into an email.
- Example:
5. System & Search
These shortcuts help you manage your Mac and find things quickly:
Cmd + Space: Open Spotlight search to find files, apps, or even perform calculations.- Example: Type "2+2" in Spotlight to get the result instantly.
Ctrl + Cmd + Q: Lock your screen immediately.Option + Cmd + Esc: Open the Force Quit Applications window (useful if an app is frozen).
Pro Tip: Discover App-Specific Shortcuts
Install the CheatSheet app (included in your setup). Hold down the Cmd key for a couple of seconds in almost any application, and it will display a list of available shortcuts for that specific app. It’s a great way to learn shortcuts as you go!
By mastering these shortcuts, you’ll save time and work more efficiently on your Mac. Start with a few that seem most useful, and build from there. Happy shortcutting! ⚡️
Guides (Published via mdBook)
The detailed guides for installation, tool usage (Brew, Git, Docker, Conda, Rust, etc.), and macOS tips are maintained in the /docs directory and automatically published as an online book using mdBook and GitHub Pages.
📚 Access the Online Guides Here You can also build and view the guides locally:
- Ensure you have Rust and
mdbookinstalled (the setup script09_install_rust.shhandles this). - Navigate to the repository root directory.
- Run
mdbook serve --open.
Contributing to dotFile
Thank you for your interest in contributing to our project! This document provides guidelines and instructions for contributors.
Code of Conduct
By participating in this project, you agree to abide by our Code of Conduct. Please read it before contributing.
How to Contribute
Reporting Bugs
Before creating bug reports, please check the issue list to avoid duplicates. When creating a bug report, include:
- A clear, descriptive title
- Detailed steps to reproduce the issue
- Expected behavior vs actual behavior
- Screenshots (if applicable)
- Your environment details (OS, browser, etc.)
Suggesting Enhancements
Enhancement suggestions are tracked as GitHub issues. When creating an enhancement suggestion:
- Use a clear, descriptive title
- Provide a detailed description of the proposed functionality
- Include examples of how the feature would be used
- Explain why this enhancement would be useful
Pull Request Process
- Fork the repository
- Create a new branch (
git checkout -b feature/your-feature) - Make your changes
- Run tests if available
- Update documentation if needed
- Commit your changes (
git commit -m 'Add some feature') - Push to your branch (
git push origin feature/your-feature) - Create a Pull Request
Pull Request Guidelines
- Follow the project's coding style and conventions
- Include tests for new features
- Update documentation as needed
- Ensure all tests pass
- Keep pull requests focused on a single feature/fix
Development Setup
# Clone the repository
git clone https://github.com/username/project.git
Commit Messages
Follow these guidelines for commit messages:
- Use the present tense ("Add feature" not "Added feature")
- Use the imperative mood ("Move cursor to..." not "Moves cursor to...")
- Limit the first line to 72 characters
- Reference issues and pull requests after the first line
Documentation
- Keep README.md up to date
- Document new features
- Update API documentation if applicable
- Add comments to complex code sections
Getting Help
- Check out the documentation
- Create an issue for questions
Recognition
Contributors will be recognized in our README.md and release notes.
Thank you for contributing!
Contributor Covenant Code of Conduct
Our Pledge
In the interest of fostering an open and welcoming environment, we as contributors and maintainers pledge to making participation in our project and our community a harassment-free experience for everyone, regardless of age, body size, disability, ethnicity, gender identity and expression, level of experience, education, socio-economic status, nationality, personal appearance, race, religion, or sexual identity and orientation.
Our Standards
Examples of behavior that contributes to creating a positive environment include:
- Using welcoming and inclusive language
- Being respectful of differing viewpoints and experiences
- Gracefully accepting constructive criticism
- Focusing on what is best for the community
- Showing empathy towards other community members
Examples of unacceptable behavior by participants include:
- The use of sexualized language or imagery and unwelcome sexual attention or advances
- Trolling, insulting/derogatory comments, and personal or political attacks
- Public or private harassment
- Publishing others' private information, such as a physical or electronic address, without explicit permission
- Other conduct which could reasonably be considered inappropriate in a professional setting
Our Responsibilities
Project maintainers are responsible for clarifying the standards of acceptable behavior and are expected to take appropriate and fair corrective action in response to any instances of unacceptable behavior.
Project maintainers have the right and responsibility to remove, edit, or reject comments, commits, code, wiki edits, issues, and other contributions that are not aligned to this Code of Conduct, or to ban temporarily or permanently any contributor for other behaviors that they deem inappropriate, threatening, offensive, or harmful.
Scope
This Code of Conduct applies both within project spaces and in public spaces when an individual is representing the project or its community. Examples of representing a project or community include using an official project e-mail address, posting via an official social media account, or acting as an appointed representative at an online or offline event. Representation of a project may be further defined and clarified by project maintainers.
Enforcement
Instances of abusive, harassing, or otherwise unacceptable behavior may be reported by contacting the project team at {{ email }}. All complaints will be reviewed and investigated and will result in a response that is deemed necessary and appropriate to the circumstances. The project team is obligated to maintain confidentiality with regard to the reporter of an incident. Further details of specific enforcement policies may be posted separately.
Project maintainers who do not follow or enforce the Code of Conduct in good faith may face temporary or permanent repercussions as determined by other members of the project's leadership.
Attribution
This Code of Conduct is adapted from the Contributor Covenant, version 1.4, available at https://www.contributor-covenant.org/version/1/4/code-of-conduct.html
Automate Your Mac Setup: A Developer’s Guide
Setting up a new Mac for development can be tedious. Installing tools, configuring the shell, and tweaking settings by hand often takes hours and can vary between machines. After years of doing this manually across multiple devices, I created an automated setup to handle it more efficiently.
This post outlines a tool that cuts Mac setup time to about an hour. It’s something I’ve used myself and shared with others, like when I set up my son’s Mac mini. You can find it on GitHub at ravishan16/dotFile. Feel free to try it, tweak it, or suggest improvements.
Why Automate?
Manual setups have drawbacks. Automation offers a few clear advantages:
- Saves Time: Drops setup from several hours to roughly one by handling repetitive tasks.
- Keeps Things Consistent: Applies the same configuration every time, avoiding differences between machines.
- Simplifies Replication: Makes it easy to set up new devices or assist someone else.
- Tracks Changes: Uses Git to manage your environment, so you can see or undo modifications.
- Speeds Recovery: Re-runs quickly if you reset your system.
- Teaches Skills: Shows how shell scripting and configuration work if you dig into the code.
These points come from real experience, not hypotheticals.
What’s in the Setup?
The repository (ravishan16/dotFile) includes scripts and files to automate a developer environment on macOS. Here’s what it covers:
Installation Scripts (scripts/):- Homebrew: Manages CLI tools and GUI apps.
- CLI Tools: Adds
git,node,ripgrep, and more (check02_install_brew_core.sh). - GUI Apps: Installs VS Code, iTerm2, Docker, Raycast, etc. (see
06_install_apps_cask.sh). - Shell Setup: Installs Zsh with Oh My Zsh and plugins like
zsh-autosuggestions,zsh-syntax-highlighting, andautojumpfor a better terminal. - Python: Sets up Miniconda for isolated Python environments.
- Git & SSH: Configures Git and creates SSH keys for GitHub access.
- Rust: Installs Rust and Cargo via
rustupfor managing Rust projects and tools likemdBook(see09_install_rust.sh). *Dotfiles (dot/): - Includes
.zshrc,.aliases,.gitignore_global, and others. - Symlinks these to your home directory so updates in the repo apply instantly.
Docs (docs/):- Offers guides on Homebrew, Zsh, Git, Conda, Docker, Rust, and macOS shortcuts.
- These guides are built into an online book using mdBook (installed via script
09) and published automatically via GitHub Actions. It’s a straightforward package to get a working dev setup with minimal effort.
It’s a straightforward package to get a working dev setup with minimal effort.
Guides (Published via mdBook)
The detailed guides for installation and tool usage are maintained as Markdown files in the /docs directory. They are automatically built into an online book using mdBook and published via GitHub Actions to GitHub Pages.
📚 Access the Online Guides Here You can also build and view the guides locally:
- Ensure you have Rust and
mdbookinstalled (script09_install_rust.shhandles this). - Navigate to the repository root directory.
- Run
mdbook serve --open.
| Guide Title | Description |
|---|---|
| dotFile: Installing Your Automated macOS Setup | Step-by-step guide to set up your macOS environment with automation. |
| Managing Software with Homebrew 🍺 | Learn how to install, update, and manage software using Homebrew. |
| Using Your Zsh Shell Superpowers ✨ | Tips and tricks for using Zsh with Oh My Zsh, Powerlevel10k, and plugins. |
| Basic Git & GitHub Workflow | A beginner-friendly guide to using Git and GitHub for version control. |
| Managing Python with Conda (Miniconda) | Guide to managing Python environments and packages with Conda. |
| Basic Docker Maintenance 🐳🧹 | Learn how to prune and clean up Docker containers, images, and volumes. |
| Your Terminal Command Center (iTerm2) 💻 | Guide to customizing and using iTerm2 for an efficient terminal experience. |
| Rust Essentials Guide 🦀 | Quick reference for essential Rust and Cargo commands. |
| Mac Keyboard Shortcut Cheat Sheet ⚡️ | A handy list of keyboard shortcuts to boost your productivity on macOS. |
| Basic Mac Housekeeping 🧹✨ | Tips for keeping your Mac clean, organized, and running smoothly. |
| Custom Shell Aliases & Functions 🛠️ | Learn how to create and use custom aliases and functions in your shell. |
| Redis Cheatsheet for macOS 🍎 | Quick commands and tips for installing, managing, and using Redis on macOS. |
How to Run It
Here’s how to use the setup on your Mac:
-
Fork the Repo: Go to
ravishan16/dotFileand fork it to your account. -
Clone It: Pull it down to your machine:
mkdir -p ~/projects/git cd ~/projects/git git clone <your-fork-url> dotFile -
Set Up .env:Copy the example and fill it in:cp .env_example .env # Or touch .env if no example exists nano .envAdd:
GIT_HOME="~/projects/git" # Adjust if you cloned elsewhere GIT_AUTHOR_NAME="Your Name" GIT_AUTHOR_EMAIL="[email protected]" -
Edit Dotfiles: Tweak
dot/.zshrc,dot/.aliases, or others to fit your needs. -
Run the Script: Go to the scripts folder and start it:
cd ~/projects/git/dotFile/scripts
bash run_all.sh
Pick "all" from the menu and enter your password when asked.
-
Finish Up:
- Restart your terminal.
- Add the SSH key to GitHub (script will guide you).
- Log into any GUI apps like Docker.
After this, your Mac will have a configured dev environment, including Zsh with Oh My Zsh and plugins.
How to Customize
You can adjust the setup to suit your workflow:
- Change Tools: Edit
02_install_brew_core.shfor CLI tools or06_install_apps_cask.shfor apps. - Tune the Shell: Modify
dot/.zshrcfor Zsh settings ordot/.p10k.zshfor the prompt (runp10k configureto update it). - Update Python: Adjust
python/requirements.txtand re-run script05for Conda packages.
Forking the repo lets you make it your own.
Get Involved
This setup works for me, but it’s better with input from others. Here’s how you can help:
- Fork It: Adapt it for yourself.
- Submit Pull Requests: Share fixes or new features.
- Open Issues: Flag bugs or ideas.
- Give Feedback: Tell me what’s useful or what’s not.
Contributions keep it practical and relevant.
Wrapping Up
Automating your Mac setup cuts down on time and hassle. This tool gets you a consistent dev environment with Zsh, Oh My Zsh, and plugins included, so you can focus on coding.
Check it out: ravishan16/dotFile
If it helps or you’ve got thoughts, let me know. I’d like to see it grow into something developers can rely on.